CompassAir Web Basic User Guide


Volume 9 – SnP Purchase Enquiry Screen

This guide is intended to serve as an introduction to CompassAir (web version). It is one of a series that show the many useful features of CompassAir (web version).

Where it is felt that additional training would be beneficial, bespoke packages can be provided for both individual users as well as groups. Please contact solutions@thinkcompass.io for more information.

1      COMPASSAIR – MESSAGES WINDOW (HOME SCREEN)

CompassAir Home Screen

2    PURCHASE ENQUIRY USER INTERFACE

1. Having selected “Purchase Enquiry” from the toolbar, the P/E interface is divided into three parts. On the left is the search screen.
2. In the middle of the screen is the list of P/Es from the search.
3. On the right there are displayed the technical and commercial

details of the chosen P/E along with the related messages,
files, ships and matching ships.
4. An individual P/E can be opened in a new tab by clicking on the row of the particular P/E in the list.

5. From the ellipsis menu, Auto Resize changes the column width back to default. Data can also be downloaded into a spreadsheet, either all on the current page or all data returned from the last search. “Change View” splits the screen horizontally or vertically (in the image above the screen is split vertically).
6. Once a P/E has been selected, it can be edited using the “Edit” button.

3    SHIPS SCREEN “LIST”


Within the Ships module there is a feature called the “List”. This is a way to keep a temporary short list of ships as selected from the full list of ships. It is totally independent from the List found in the P/E screen. Being only temporary, it is automatically deleted when the CompassAir screen is either refreshed or re-loaded.

1. From the full list, those vessels of particular interest are first selected using the tick box next to the vessel name. When one or more vessels are selected they can then be added to the “List”. This is achieved by right clicking on one of the selected vessels then from the drop down menu selecting “Add to List”. If the List is empty the “Folder” icon will be greyed out.
2. The Ships screen effectively now has two modes: the full vessel list and the “List”. Toggling between the two is achieved by clicking on the “Folder” icon or using the blue search button again. The pocket is not deleted by doing so. When viewing the “List” the “Folder” icon is shown as open, when viewing the full list of vessels it is shown closed.
3. The “List” can be edited or cleared by selecting vessels and then clicking either on “Empty List” from the drop down list to clear all, or “Remove from List” for only the selected vessels.
4. The “Highlight” field can be used to draw attention to particular words or numbers in the list of vessels either in the full list of vessels or those in the List– in this case the word “Princess”.

4      SEARCH FIELDS

1. Using the “Gear” icon, the search fields can be customised.

2. Adding or removing fields  is achieved by moving fields between available and selected, and changing their order using the menu on the right.

5     SEARCHING FOR P/Es

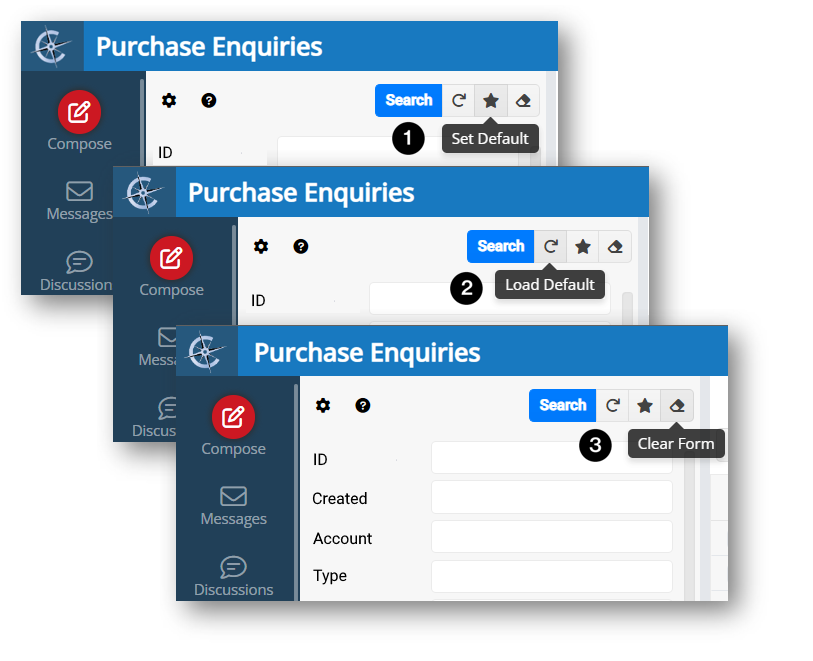
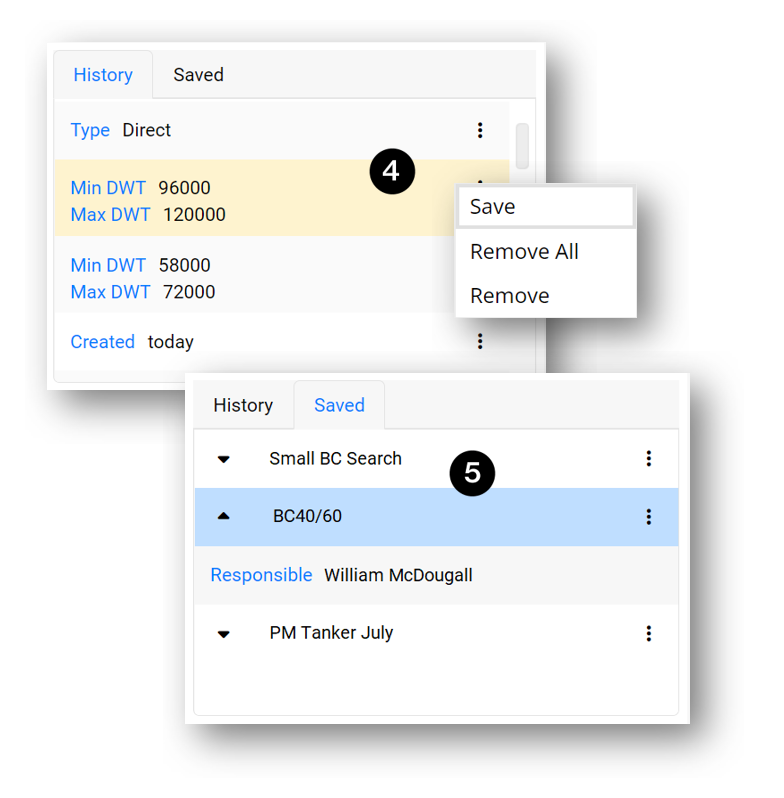
1. Where the same search is used many times it can be set as the default. In other words, the fields can be populated by the same data, achieved using the “Star” icon, which saves the current parameters (searches can also be saved, see 4 and 5 below). Note that default searches must include at least one populated field.

2. To load the default search parameters, use the “Refresh” icon.

3. In order to quickly clear all fields, ready for a new search, use the “Eraser” icon.

4. Searches are automatically saved in the window below the search box. The ellipsis allows a search to be saved (see 5 below) or for one or more historic searches to be removed from the list.

5. Where a search is saved, it is accessible on the second tab, having been given a name. Initially only the search name is displayed, the drop down reveals the detail. Again, the ellipsis allows for the search to be removed or edited.

6    PURCHASE ENQUIRY TABS

1. Detailed information for each P/E can be found on the tabs on the right hand side of the P/E screen. The first, “Messages” displays all historic emails, each one can be viewed by clicking on it.

2. The second tab, ”Files” lists any files that have been associated with the P/E.

3. The third tab, “Market” lists the sale history of similar ships, extracted from the vessels database. As in 4.1 above, the fields are customisable, including or excluding information as required.

4. CompassAir automatically attempts to match relevant ships currently for sale (if CompassPulse is installed, the user is immediately notified of such matching ships) which are then displayed on the “Matching Ships” tab. For a detailed insight into how this information is incorporated into workflows visit our website.

5. Ships that have either been proposed or shortlisted are moved to the “Ships” tab. Again, for a detailed insight into associated workflows visit our website.

7    “MATCHING SHIPS” TAB – PROPOSING SHIPS

1. Having automatically matched relevant ships currently for sale to a P/E, CompassAir displays these on the “Matching Ships” tab. By right clicking one of the ships shown, it can either be proposed, moved to the “Ships” tab (effectively a short-list), emailed, copied or opened on its own or as part of a list for further investigation. For more information, please visit our website.

8    “SHIPS” TAB – INVESTIGATING AND PROPOSING SHIPS

1. Having short-listed ships on the “Ships” tab, they can then be proposed or further information about each ship viewed by right clicking on the ship’s name and selecting “Open Detached”. Alternatively, details of each ship (or multiple ships if selected using the tick box) can be displayed in list form from either the “Ships” or the “Matching Ships” tabs. From the list, further details from the vessel database (including related messages, files, etc.) can again be viewed for each ship by clicking on it. In a new tab there will be displayed full details, including ship data, messages relating to the ship, contacts etc.. For more information, please visit our website.

9  TEMPLATES – CUSTOMISING THE SEARCH RESULTS SCREEN


Having searched for PEs with particular criteria, the results are displayed in a grid, the columns appearing originally being defined by the “default template” (see 1 below).

The columns can then be customised using the gear icon (see 2 above). Once the user has selected and applied the new format the template can be saved using the drop down menu at 1 above, selecting “Add Template”, a pop-up window appearing into which can be saved the new template name.

Similarly, templates can be changed from the selection in the same drop-down menu. The reason for doing this is that certain columns may not be relevant to the user if, for example, only Direct PEs have been selected. As well as producing a smaller, more manageable grid, restricting the number of columns, i.e. deleting those that are not appropriate, also speeds up the search.

It should be noted that this “templates function” is available on all screens, including for example the “Ships” screen. Also, that when CompassAir is closed the last template in use will be the one that is loaded initially after next logging in, and which can be changed as above.