
12
May
More Windows 10 tips to make life easier
in General
Comments
In an increasingly competitive world where time always seems to be in short supply, we each continue to search for ways in which this scarce resource can be used more efficiently. Some of our most popular articles have been about features of both Windows and Chrome, some familiar, some less so, that help towards achieving this aim.
Around a year ago we published “20 tips to save valuable time”, focused on Windows 10. At the turn of this year we looked at “21 email tools, tips and hints for 2021” identifying a number of ways our own CompassAir software can contribute in a similar way, following up last month with “Making better use of Google Chrome”, the browser we recommend when using CompassAir, and how to make life that little bit easier.
Feature updates are released for Windows 10 twice a year, around March and September. Given the popularity of our previous articles, we thought it would be helpful to take another look at Windows 10, including some not so new features. As before, you may already be familiar with some of these, and if not, hopefully they will contribute towards freeing up some of your time, allowing it to be used for other, more profitable priorities.
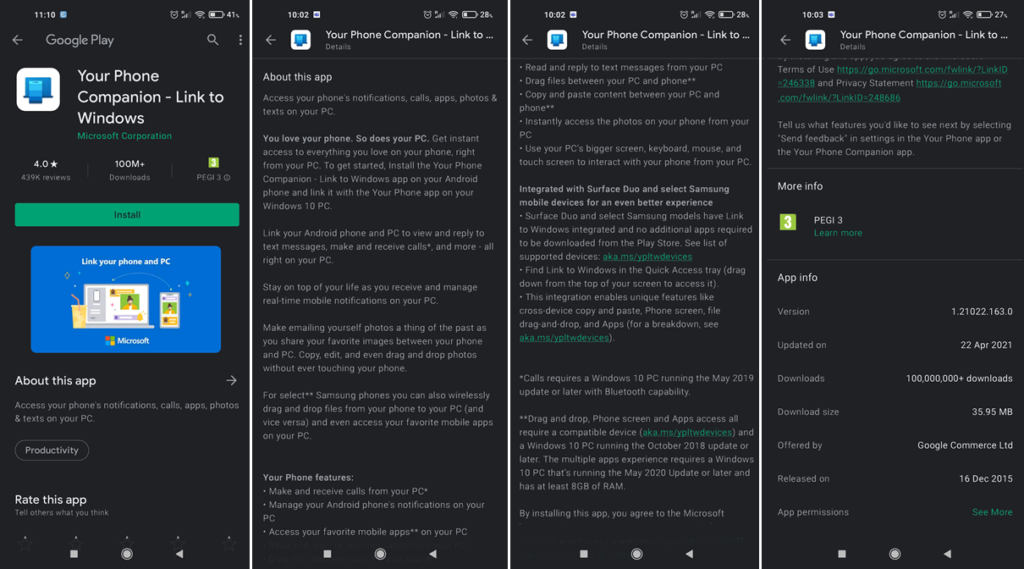
1 Your Phone App
Microsoft’s My Phone app lets you make and receive both calls and texts, check notifications and access your Android device’s photos from your PC (in order to make calls you will need a Windows 10 PC running the May 2019 update or later, together with Bluetooth capability).
You should find the Your Phone app pre-installed with Windows 10 (if not it will need to be downloaded from the Microsoft Store), finding it by using the search box on the taskbar.

Once the app is open on your PC go to My Devices and “Link new device”, choosing Android from the next screen.

You will be instructed to enter aka.ms/yourpc in your phone’s browser.

After this has been done you can then install the app from Google Play.
With the app now installed on your phone, you will be asked to allow certain permissions that enable the phone and PC to work together. When those permissions have been set your phone may ask to connect to your PC. Alternatively tick the box and select how you want to pair your PC and phone – using the QR code is probably easiest. Make sure that on both your phone and PC Bluetooth is set to on.

When the Your Phone app is opened on your PC and is linked to your Android device you will then be ready to make calls from your PC, send and receive messages, see notifications as they appear on your phone and access your photos, providing of course that the appropriate permissions have been allowed.
If later you wish to cease using the Your Phone app, from Task Manager it can be stopped from running in the background (Task Master/Processes/Background Processes and then ”End Task”). If the app is loading at start up, then it can be prevented from doing so via Start/Settings/Apps and Features/Startup.
2 Skype Meet Now
As we are looking at Windows related features it seems appropriate to mention Microsoft-owned Skype and the “Meet Now” video call product.
A video call can be arranged for up to 100 people without any having to sign up to Skype (if you don’t have Skype the call will be made using your browser as the interface) and without having to download any software. Each call can be recorded (and stored for up to 30 days) and can last for up to 24 hours.
Search on “Skype Meet Now”, then click on “Create a free video call” and share the link using one of the choices below.

You will then be able to customise your message to those you wish to invite.

3 Magnifier and Reading Text
You may or may not have heard of Microsoft Magnifier, one of the Windows 10 built-in accessibility tools for people who are blind, colour blind or have low vision. It can be very useful when it’s necessary to read small print, such as that found in legal documents, making use of a split screen which still allows a document to be viewed at normal magnification, at the same time increasing the size of only a chosen part of that document. Not only is it a visual aid, but Magnifier can also read text out loud.
Magnifier can be turned on by pressing the Windows logo key and the +Plus sign, and turning off by pressing the Windows logo key and Esc.
The screen then splits into two, the magnified portion being at the top, with the content that is displayed being determined by the location of the cursor.
All tabs that are currently open will now be reloaded.

To use Magnifier to read text out loud, it will start from the current cursor location after pressing Ctrl+Alt+Enter. The same combination can be used to pause and then resume reading. Alternatively, the same can be achieved by pressing and holding Ctrl +Alt and clicking the left mouse button where you would like to start. To stop reading simply press any key.
4 Snip & Sketch
Snip and Sketch has been a feature of Windows 10 for some time, replacing the old snipping tool in late 2018. It’s simple to use and saves time if you need to share selected parts of your current desktop or keep a permanent record of documents or images seen on your screen.
To start the tool first access the app either from the Windows Start menu or by typing “Snip and Sketch” in the search box on the task bar. Once open, if you intend to use it on a regular basis, you can right click on the icon when it appears on the task bar, selecting “Pin to Task bar”. Alternatively the app can be started by pressing the Windows logo key + shift + S. Another way is to go to the action centre on the bottom right of the task bar and click on the Screen Snip tile.

From the drop down menu there are three options: Snip now, in 3 seconds or in 10 seconds. The delay is useful when you need to interact with other programs before the toolbar appears. For example, when you hover over an item in a browser you may see a text box appear, or click on a drop down menu. They often then disappear when you move the cursor away – if you need to include that text or the choices available from the drop down menu in your snipping set the delay for say 3 seconds, hover to make the text appear or click on the drop down menu and wait for the app to start, ready to capture whatever is on the screen at that moment.
Having started the app, the screenshot toolbar appears at the top of the screen.

The options, from left to right are a rectangular snip (left clicking dragging the mouse to capture the area required, then letting go), freeform (lets you draw out the area of your screenshot), third to copy a particular window by clicking into it and finally a full screen snip (which will capture everything visible, including on multiple screens if they are being used).

The screenshot can then be marked up using the annotation tools – from left to right: touch screen, ballpoint pen, pencil and highlighter. Also available is an eraser, a ruler and a protractor.
The snipping can then be saved, copied to the clipboard or shared using any available apps as below.

5 Focus Assist
Notifications – emails, texts, and numerous apps – can be an unwelcome distraction when under pressure to complete an important task. Focus Assist is a way of telling Windows 10 to give you some space for a certain time.
Using Focus Assist you can tell Windows to only show you selected notifications, all others being accessible at any time from the Windows Action Centre at the bottom right hand corner of your desktop.
You can turn on Focus Assist using Settings/System/Focus Assist. Using Priority Only you can then select those notifications that you consider to be high priority, i.e. those not suspended and sent to the Action Centre, as well as set rules that, for example, activate Focus Assist during specific times of the day.

Those notifications you consider to essential are set by clicking on “Customise your priority list”.

Here you can choose which notifications you see during this quiet period by making a selection from both apps and people. Turning Focus Assist on or off is simple, achieved by scrolling through the tile in the Action Centre.
